


This tutorial shows :
- how to build a map file,
- how to check its content,
- how to use it at runtime.
We will follow the tradition: the program we are writing here just displays an 'hello, world' message.
In order to trigger autoloading, the message is displayed using methods from two different classes, defined in two different PHP scripts. The program will display the message in HTML if we are in a web environment, and as plain text, if we are in CLI mode.
Before you start, please ensure that the PHP version you are using is at least 5.3.0.
1 - Download the Automap software
First, if not already done, download the latest Automap distribution from Github. The software comes in the form of a tar/gz file. Uncompress and untar it anywhere you have write access. Once it is done, you will find a file named automap.phk. This is the map building/management tool AND the runtime library. The rest of the distribution is composed of examples and documentation.
 Note that the example described below is contained in
the distribution, in the examples/hello subdirectory.
Note that the example described below is contained in
the distribution, in the examples/hello subdirectory.
Now, create an empty directory, anywhere on the system, cd there, and copy the automap.phk file into this directory. This will be our base directory.
For the sake of simplicity, we put the automap.phk runtime script in our
base directory, but it could be located anywhere on the system.
As this file contains the runtime code, it should be distributed with your application.
2 - The PHP scripts
Now, we create our example PHP scripts.
First, the main script. In our base directory, create a file named 'hello.php' containing :
<?php |
Now, we define the auxiliary classes. In order to make it simpler to scan these files, we create them in a subdirectory.
Create a subdirectory named 'src'. In this subdirectory, create these two files :
message.php :
<?php |
env.php :
<?php |
Note that there is no restriction on files names which, here, have nothing in common with the classes they contain. As an exercise,
after you finish the tutorial, rename the files, rebuild the map, and run
the program again. You may also merge both classes in a single file, enrich the code with a third class, or experiment with namespaces...
3 - Building the map file
Now, it's time to build the map. Once again, to keep it simple, we will create the map file in our base directory.
First, cd back to the base directory (the directory containing hello.php).
We assume that the 'php' command (or the 'php.exe' file on Windows) is
in your path. If it is not the case, add it to your path or modify the commands
below to specify the absolute path of the php executable.
In command line mode (in a shell/command window), run:
php automap.phk register src |
This command creates a map file, named auto.map, in the current directory. This is the default name for the map file. Using the '-m <path>' option, we could specify another filename.
About the command arguments :
- register : The action. When running automap.phk in CLI mode, the first argument is always an action to execute. Run 'php automap.phk help' for the list and syntax of every possible actions.
- 2nd arg and up: A list of relative paths to scan. These can be directories and/or regular files. If a directory is specified, it is recursively scanned and each file recognized as a PHP script is scanned for symbols.
Note that these relative paths relate to the directory containing the map ('.' here). If we had created a map in another directory (via the '-m' option), the path arguments would have been considered as relative to this directory.
4 - Displaying the map's content
Now, everything is ready to run. But, first, we want to ensure that the classes where correctly registered.
Run :
php automap.phk show |
This will display something like:
* Global information : |
We see that our two classes were detected and registered as expected.
5 - Running the package
Now, we run our program and check that it autoloads the 'Message' and 'EnvInfo' classes :
5.1 - in CLI mode
Run :
php hello.php |
which should display :
Hello, world |
If you see this message, pat yourself on the back ")
5.2 - in Web mode
Now, copy the base directory and everything it contains (files and subdirectories) to a location accessible through a web server.Then, point your favorite browser to the 'hello.php' file.
This should display something like :
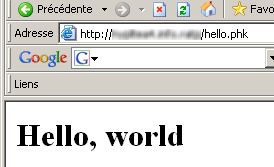
Note that the message is displayed in HTML, proving that the stuff is working.
6 - Conclusion
This is a very basic example, but the mechanism is exactly the same for large and complex programs/libraries :
- Build the map in CLI mode using a syntax similar to the one we used here.
- In your main script, require() the 'automap.phk' file and, then, \Automap\Mgr::load() your map(s). There is no limit to the number of maps that can be active at the same time.
You will find other examples in the distribution (examples subdirectory).
